Showing posts with label healthy. Show all posts

Saturday, 6 April 2013

DIY Pea & Quinoa Fritters

Looking for a quick tasty meal or a yummy snack? Look no further, these Pea and Quinoa Fritters are the perfect addition to your meal plan.
Unfortunately, I cannot take the credit for these delicious morsels, it was Donna Hay (from her book Fresh and Light) from which I found (and slightly altered) the recipe.

Ingredients:
2.5 cups cooked peas
2 cups cooked quinoa
1 eggwhite
2 tbsp rice flour
2 tbsp vegetable oil
sea salt and cracked pepper
extra oil for cooking


Directions:
1. If your peas are uncooked/frozen.
Place your peas in a bowl and cover with boiling water. You can either let them sit, covered, until they defrost/cook or you can chuck them in the microwave for a few minutes (i'm always in a hurry and I prefer the microwave method)

2. While your peas are cooking, place the quinoa (if you don't know how to cook quinoa see the bottom of this post for info), rice flour and vegetable oil in a separate bowl. Also, separate your eggwhite.


3. Once the peas are cooked, mash them up. The consistency of your peas is a personal preference. I like mine pretty mushy and I use a stick mixer to give them a quick mash.

4. Add all the ingredients together.
I get really paranoid that the eggwhite start cooking because of the hot peas, so I usually add that last.


 5. Mix thorougly.


6. Add a little veg oil to a pan and heat to a moderate temperature.

7. Make little patties and place in pan.
I like to scoop out a 1/4 or 1/3 cup full of the mix to make my patties. That way they're all a similar size and shape. Note I squash them with my fingers so they're about 1-2 cm flat when they're in the pan.


8. Cook for around 5 minutes. Check the bottom of them, they're ready when they go crispy brown. 

9. Flip them over and cook for around the same length of time on the other side.

10. Serve.
I'm currently obsessed with mexican food and here I've served them with a homemade spicy salsa. They also go great with a fresh zucchini salad. 

The nitty gritty details:
Serves 4, depending on how hungry you are and what you serve them with.
Approximately 300 calories per serve (they are ALL good calories, ain't nothing unhealthy in these).
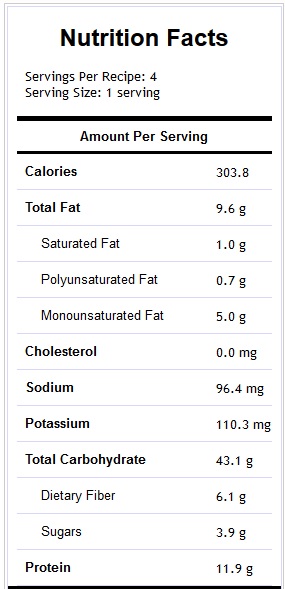
This nutritional info has come straight from: Spark People Recipes


How do you cook quinoa?
Quinoa pretty much doubles when you cook it (like rice), and this is how I cook it.
1. Thoroughly rise 1 cup quinoa
2. Place quinoa with 2 cups water in a pot (1 part quinoa, 2 parts water)
3. Add a stock cube (you don't have to do this but I think it really adds great flavour)
4. Heat on high and stir until boiling
5. Reduce to a low heat so its simmering and place a lid on (don't put the lid completely over because the liquid might boil over
6. Cook, stirring every now and then, until the liquid has been absorbed (usually 10 minutes)
7. Once cooked give it another good stir and, if you have time, leave the lid completely covering the pot and let sit for another 10-15 minutes - this allows the quinoa to become really soft and fluffy, I ALWAYS do this now!
That's it, it's soooo easy
xx

Tuesday, 2 April 2013

Review: Dermaquest

The Dermaquest skincare range has a great reputation.
It was developed by Sam Dhatt, a cosmeceutical chemist who has years of experience. He was the leading chemist for many of the best-skin skincare brands in the world (over 700 companies) and decided to start his very own range.
Sam has developed products that contain cutting edge ingredients that achieve the highest possible results.
The products aren't cheap, but in the longterm, they are most definitely worth it. Always, use a sample for a few weeks to work out if the product is right for you. I was introduced to them by the lovely ladies at Skinastute and these are the products I have tried:

It took me a while to find the cleanser that suited me. Personally, the C3 Cleanser and the Daily Enzyme Cleanser didn't feel like it cleaned my makeup off properly or really cleansed my skin. Instead of being pressured into purchasing the cleanser, I kept trying until I found the right one, which for me, was the Stem Cell 3D Facial Cleanser. When I use it, it feel amazing, it's a slightly off-white colour (naturally pigmented) and is quite thick. You emulsify it in your fingertips (the size of a pea) and lightly rub over your face in circular motions. It gets all of my makeup off and my skin feels pristine and clear after, perfectly prepped for my next product.
Stem Cell 3D Facial Cleanser

The niacinamide is also a fabulous product, it contains vitamin B3 (a skin rejuvenator that treats acne, hyperpigmentation, improves the skin barrier and is an anti-inflammatory. It also contains MATRIXYL™, which promotes the production of collagen, what we all need to improve skin elasticity. it also contains RIGIN™, which increases tissue regeneration and lastly, sodium hyaluronate, which hydrates, and subsequently, plumps and smooths the skin. To apply the niacinamide you use one pump of the dispenser, distribute over fingertips and then apply to face and decolletage. Then 'press' it into the face, this helps it to penetrate. Then allow to dry before applying next product.
Niacinamide

Skin Vitalight is a beautiful moisturising lotion that helps to inhibit pigmentation and even out skin colouring. It has a whole heap of great ingredients, including sodium hyaluronate. You apply a pea size to the fingertips and gently massage into the skin. It makes your skin feel so silky smooth!
Skin Vitalight

After a few weeks of using these products my face felt fantastic! It also visually improved, my mum actually asked me if I'd had botox in my forehead haha (it was poor lighting).
I highly recommend Dermaquest products, but most of all I recommend that get a skin consultation and then try samples that your beauty therapist suggests until you find the right one for you :)


It's very important to know that you cannot buy this product online. Although you might see it online, these products cannot be trusted. Dermaquest do not sell or distribute online so you much buy it from a clinic. These products are medical grade and it is imperative they are purchased and use accordingly.

Any Q's about these products, let me know. And I would love to know what products you use that you have tried and tested and and make you beautiful  xx


Friday, 15 March 2013

DIY Quinoa & Oat Granola


Okay, firstly I know that 'Quinoa & Oat Granola' does not sound particularly appetizing, but I'm not particularly creative and it's all I could come up with, without making a really long name like 'Quinoa, Oat, Cranberry, Date and Maple Granola', or without lying. 
Anyway, I digress, does anyone else seem to get crazy hungry at like 10 am in the morning, only to realise that, alas, lunch is still at least 2 hours away! No longwer do you need to struggle on with those hunger pangs and distracted thoughts, because my granola is super filling, super healthy, super crunchy and super yummy! 
I have been looking for an alternative to your basic fruit and yoghurt, or porridge, or bircher muesli for a while now. Don't get me wrong I freaking love all of the above but I was looking for something different, something you can't buy, but takes 2 seconds to prepare. After scouting the internet and various recipe books I decided that I would have to make my own recipe, merge all the great ideas I had found to create one spectacularly awesome cereal.
Here's what's in it...  
 

Ingredients 

Dry -

    1 cup quinoa (rinsed and drained thoroughly)
    2 cup rolled oats (not quick oats, the real ones)
    0.5 cup shredded coconut (or desiccated)
    0.75 cup flaked/slivered almonds
    0.5 cup seed mix (sesame, linseed, poppy, sunflower)
    0.5 cup chia seed
    0.25 cup pecans
    1 tsp cinnamon
    sprinkle mixed spice
    sprinkle powdered ginger

Wet -

    4 tbsp maple syrup (real maple syrup)
    2 tbsp water
    cap vanilla extract

Extra -

    drizzle honey
    0.5 cup chopped dates
    0.5 cup dried cranberries


Directions

1. Preheat oven to 180 degrees celcius.
2. Thoroughly rinse quinoa, drain and allow to dry.
3. Combine all dry ingredients in a large bowl.
4. Add wet ingredients to dry ingredients and stir well.
5. Spray a piece of baking paper with oil.
6. Spread a thin layer of the mix onto the greased baking paper.
7. Bake for around 30 minutes, stirring once.
8. Add extra ingredients and drizzle with the honey.
9. Bake for an additional 30 minutes.
10. Remove and allow to cool.


Serve with yoghurt or milk (it's great with both!)
Enjoy!

Number of Servings: 12 (0.5 cup per serving)


If you're ever making recipes and need to know the nutritional details, I highly recommend Spark People Recipes, which is what I used. They also have whole heap of healthy tasty recipes.


At first glance this might seem like a high calorie breakfast. But, you have to think about the nutritional benefits you get from this kind of food. Not only that but this granola will keep you full for hours, and it's so yummy and easy! 

Tip: Decrease cooking time if you don't like your granola crunchy
Tip: To make a seriously yummy parfait I have been layering chobani 0% plain yoghurt with the granola and frozen blueberries. Leave to sit for 15 minutes (while you have a shower) and the blueberries will de-frost but still be deliciously cool. Perfect for a hot, summer morning! I also like to prepare a 'green tea with jasmine' tea when I make my breakfast, pop a few ice cubes in it and have a icy drink with my parfait! 
Parfait perfection
Related Posts Plugin for WordPress, Blogger...